It’s that time of year again when the potatoes have to be purchased ready for chitting. So on Saturday morning me and my Dad headed off to our local independent nursery to pick the lucky little seeds!
We love Gilberts, it’s a beautiful independent nursery filled with flowers, seeds, trees… in fact it has everything a gardener needs (including a tearoom!) The best thing about Gilberts is how they sell the seed potatoes, there’s a whole aisle filled with lots of large hessian and brown bags full to the brim with so many different variety of potatoes. You choose the ones you want, fill a bag with however many you need and then pay by weight at the till. It’s ever so handy when you are like me and my Dad and plan exactly how many potatoes you need, it also saves buying bags of seed potatoes when you don’t know how many are actually in each bag!
This year my Dad is growing 56 Kestral potatoes, 56 Cara and 18 International Kidney. I’m also growing 18 International Kidney potatoes and 18 Charlotte as well.
After choosing the potatoes I grabbed another packet of sweet pea seeds, this time I thought I would give the perrenial variety a go. The Sweet peas will be growing up my archway every year so I thought why not! We also chose a packet of pumpkin seeds called ‘Atlantic Giant’ ready to sow next month for our little friendly competiton.
And last but not least, I couldn’t resist buying two of these absolutely beautiful double Primroses, aren’t they lovely? I’ll plant them down by the pond for a bit of colour during this very wet and miserable weather we are having!
The 2015 allotment plan is now up and ready to read, Hooray! I’ve created a new page along the top so it’s easy to find, and I’ve just posted a little video where I talk through my plans as well.
I am so unbelievably excited for the year ahead and cannot wait to start sowing seeds and watch them come to life! I’m longing for lazy days up the allotment watching the bees buzzing, frogs hoping around, picking raspberries straight from the cane and being surrounded by sweet smelling flowers. Spring is just around the corner however, there’s big plans and some interesting varieties to grow this year, and not forgetting the anticipated arrival of the chickens (I will post more about them later, I promise!)
But for now, I thought I would share all my plans, hopes and dreams of what my allotment will look like this year and I hope you all enjoying reading (or watching!) x
What a complete and utterly glorious day it’s been today! The sun has been shining, the birds are singing and theres not a gust of wind or signs of rain in the air, Springtime is just around the corner and I cannot wait!
It is however, still too early to sow any seeds and I’m being patient and not risking it, there’s nothing worse then sowing seeds for them to only be destroyed by cold weather a few weeks down the line. Instead there’s a few jobs that need to be done so off I went nice and early to spend the day up the allotment in the sunshine. I miss this place terribly during the working week and especially in the Winter when evening visits are out of the question. I long for Summer days when I can relax outside the shed, surrounded by flowers, butterflies, bees and eat raspberries straight from the canes.
That is all to come though and right now my mind is set on sorting out the fruit cage, ideally I would like it netted and secure before the bushes start producing so I can actually enjoy my homegrown berries this year! It is only the bushes 2nd and 3rd years so I’m not expecting a lot, but last year the cage was unprotected and the birds beat me to it, let’s just say I was not at all happy.
The first job on the list was to sort the ground out. Now I’ve always liked the idea of having a layer of bark on the ground of the fruit cage; one, it would make my life a lot easier because I wouldn’t have to weed, and two, did I mention I wouldn’t have to weed? Ok I admit I’m a tad lazy! However, fate intervened when my Dad decided to prune some large trees in the back garden, he brought a second hand shredder and then all of a sudden we were inundated with tubs of shredded, bark sized brances. So today I find myself on hands and knees, carefully rolling out weed control fabric around the fruit bushes and securing it into the soil with pegs.
I managed to take 5 tubs of bark up to the allotment and it covered roughly about 1/4 of the cage, there’s still a huge mountain of branches to shread at home so it’s going to be a busy few days but so far I’m rather pleased with how it looks. I’ve left around 8 inches of fabric around the edges so it can be attached to the planks of wood that I’m planning on putting around the edge of the cage. The netting will also be attached to the wooden edge and a stronger net will be attached to the roof (which needs to be made higher so I can actually stand up in it!) I also mulched the 4 blackcurrants and 2 gooseberry bushes with a layer of well rotted manure and the next job will be to prune the older bushes. Once the cage is complete then hopefully the fruit can just do it’s thing, with the exception of harvesting and pruning, and I’m hoping all the hard work pays off with buckets full of berries
I also took advantage of driving the car up to drop off my new vintage trestle table. I’m planning on using it in future cooking videos aswell as for picnics and BBQ’s on the plot. The legs fold up for easy storage and so far it’s been very useful for potting on snow drops and for planning out the plot on. Now all I need is a bigger plot and then I can invite you all round for a picnic! x
For Christmas I made my Dad one of these little A5 journals so that he could write any notes, ideas and lists down whilst on his allotment. Of course I just had to make myself one and so far it has proved very useful indeed, it has my seed list in, my plan, my to-do lists and I’m sure by the end of the year it will be jam packed!
Spring is just around the corner and I am giving you the chance to win your very own allotment notebook so you can get planning for the year ahead. It’s made from real leather with ‘Allotment Notes’ stamped on the front and there is a grey cord to keep the book shut. There is a pen holder inside as well as some handy little pockets.The best thing about this journal is that the notebook is removable so it can be used every year, just simple replace the A5 notebook once it is full to the brim with all those important notes!
All you have to do is simply comment below with your full name and one reason why you are excited for Springtime to arrive.
I will draw the winner at random on the 1st of February 2015.
Even though Winter has been a mild one so far, I’m longing for sunshine, for staying up the allotment until 10pm, for flowers, bees and fresh peas straight from the pod. However, the first signs of Spring are starting to show and I noticed a little tulip tip poking out from the trough, just one of 58 tulip bulbs that I planted back in November. I cannot wait to see the trough full to the brim with beautiful tulips and to see all the bees buzzing happily around them!
I am pleased to say that the garlic has survived it’s first test, all 18 cloves have germinated and are sprouting above ground level. I have yet to make some cloches to cover the row of garlic, last year the crop pretty much failed due to the amount of rain we had (and the clay soil didn’t help either!) So this year I am being extra careful by placing a cloche over the single row so that I can control the amount of water the cloves get, that way they won’t be waterlogged, I’m hoping anyway! The variety that I am growing is called Provence and I brought the cloves from the Garlic Farm over on the Isle of Wight, surely if they can grow this variety successfully just across the water then I can too?
The broad beans have also successfully germinated and are safe and sound under their little netted tunnel. Luckily the mice didn’t run off with any of the seeds and the small seedings are safe from any hungry birds! I even sowed extra seeds just incase the mice were hungry but I’m guessing they were a tad upset after I evicted them from my shed, maybe they found a new plot to terrorise? I’ll have to thin the little seedlings out very soon, or move them somewhere else, I was only sowing one row simply because we had such a big glut of beans last year and plus my Dad is growing the next succession so it seemed silly to waste the space with unwanted veg.
Seeing these little signs of Spring on a cold and very windy day makes me even more excited for the warmer months. Hurry up Springtime!
I do love a good juicy red strawberry and there is nothing better then homegrown ones. I have two raised beds on my plot, each bed has 25 strawberries so that’s 50 altogether. The plan is to use one bed for making jam and the other one to eat straight from the plant. I first grew strawberries on my Dad’s plot back in 2011, I collected runners and moved all the plants over to my new plot as I was going to be growing the fruit (I didn’t just nick them, honest!) Last year we had a bumper crop of strawberries on my Dads plot and they were delicious, my Dad made a chicken wire and wooden cage for them and nothing was able to touch them. This year however has started off rather bad. I was over the moon when I noticed lots of juicy red strawberries appearing, I draped some netting over them and 2 days later they were demolished! It was a little heartbreaking having to cut away all the red juicy strawberries which had been nibbled by the mice. There were also a few small rotten ones where they had been touching the soil, I blame cats for this! It seems that before I netted the beds the local cats used them as a litter bin and in the process had flattened and moved all the straw that I had carefully laid around each plant. I guess the beds looked like the most perfect straw litter bins in the world for the cats!
So the mission began to create a cage for my beds so that they would keep the mice and birds away. Because my Dad’s original chicken wire cage worked so perfectly last year we decided that this would be the way to go (his cage is now being used to protect his nursery raised bed which was previously the strawberry bed) The problem however is the lack of space on my plot. My Dad can lift his cage on one end and rest it on the grass patch behind his raised bed whereas I would have to lift the entire frame and rest it on top of the other frame on the neighbouring strawberry bed. One, I am not strong enough to lift the frames (they are rather heavy!) and two, manoeuvring the cages might knock tomatoes off their plants in the nearby trough. It seems that I was trying too hard to fit too much into my allotment without realising that you need space to move easily around!
After much thought and nearly getting rid of the tomato trough completely, my Mum chipped in with a genius idea: ‘why not put lids on the cages?’ It was that simple! So off I went to the local diy store to buy some treated wood and I spent all of Sunday making the cages for my strawberries. My Dad helped a lot, I cut the wood, he put the frames together and then I attached the chicken wire to the frames. And ta-dah! My strawberries are saved!
We popped up the allotment to put the cages on the raised beds and they fit perfectly. They have 2 hinged lids each and one of the lids can be flipped over to rest on the other half which allows me to reach in and collect strawberries. I spent the rest of the night cutting away rotten and nibbled strawberries and I tidied up the straw which the cats had trampled too. I am so unbelievably happy with the final results and they are so practical!
I’m sorry mice, but it looks like you’ll have to go look somewhere else if you want to eat yummy strawberries (I’m sorry to other plot holders too!)
Oh my, what a busy little bee I have been these past couple of days! I seem to have neglected my poor blog terribly and I do apologize. We are near the end of setting up our campervan hire buisiness (www.sundaecampers.co.uk) and the van is going out on hire this coming weekend so it’s full steam ahead to get everything finished in time. Along with that, a job and the allotment, life is a little hectic! I’ve also been busy filming and I’ve recently put my hazel archway up (a blog post and youtube video will follow shortly!)
My camera is still sitting on the shelf broken as I have not been able to take it to a repair shop yet. I am unbelievably lost without it and I am unable to take any nice photographs of my plot, I don’t own a mobile phone you see and my compact just doesn’t quite cut it (once you use a DSLR you can never go back!) Summer is just round the corner and it’s a little frustating not being able to capture all the flowers starting to bloom, all the veg starting to flower and the allotment looking lovely and green! I think a trip into the dreaded town centre is much needed, fingers crossed it will be a quick fix and a cheap repair otherwise I will have to look at buying another camera body.
On another note there are plans afoot to change my blog into a fully working website with recipes and tutorials galore. Don’t get me wrong, WordPress is great but I find it hard to find the plugins that I need and my brother is a website wizard so I thought a change was in order. It may be a couple of months yet until it’s fully up and running, theres lots of planning to do and it’s taking a while to find an illustrator to draw my website header. Exciting times ahead!
It is unbelievably windy down on our allotment site and my poor broad beans which are growing taller everyday are taking a battering. Fortunately they still have all their flowers on them but they are starting to lean slightly despite my attempts to help them (I had to tie on another level of twine around the bamboo structure!) However I did notice another, slightly larger, bundle of broad bean pods when examining the plants which makes me so happy! It seems today was a good day to check everything because my peas have started to flower and the flowers on the strawberry plants have formed into strawberries, some of them are rather big! I can almost taste all this food!
My fruit bushes are also doing great with flowers on the two larger blackcurrant bushes and perfectly shaped gooseberries have appeared on both my bushes too! My raspberry canes are producing some nice leaves but I am not expecting much from them in their first year, two out of six of the canes have produced no foliage so I will have to replace them later on.
On other news (and this is bad news!) my trusty DSLR Canon 400D has died I am absolutely gutted and slightly annoyed, the shutter has jammed and when I researched the problem apparently it’s a known Canon fault. My job this week is to take it to a repair specialist and pray that they can fix it cheaply, otherwise I will have to look into getting a new camera and you can bet that it won’t be a Canon!
So I apologise now for the rubbish photographs that will appear here for the next couple of weeks, I am completely lost without my camera!
I finally made a decision… I’m going to create a little (and by little I mean tiny!) wildlife pond in my flower patch, which has now officially changed its name to my very own ‘Wildlife Corner!’. Yet again I have lost hours on Pinterest looking at all the beautiful and inspirational photographs on there, but these three photographs in particular have inspired me the most. I just love their simplicity and the rustic look to them and I especially love the use of the old butlers sink (I actually have one sitting in my garden!)
You are probably wondering why I had to think so hard about having a pond when really it’s a no brainer, but because my allotment is so small I was simply trying to squish as much as possible into a tiny space and I didn’t want any ground to go to waste. I was also very adament on having flowers, I generally think that every plot should have some flowers somewhere just to spread some colour and to bring in the all important bees!
My original plan was to create a flower patch at the side of my shed and simply jam pack it full of pretty flowers, not forgetting the grape vine! There was going to be sunflowers along the back, verbena, ox-eye daisies, sweet peas, a climbing rose, poppies, cosmos, scabious and even some dill all mixed in together to create a wild and rustic patch. This little area was going to be a place for me to escape, I was going to create a very short path which leads into the centre of the flowers with a little mushroom seat so I could sit down and get lost in the aroma. I am a little bit sad that I am going to loose the space for my little mushroom seat (that I don’t even own but it would have looked nice!) but plans change and although there won’t be room to sit in the patch, it will still hopefully look idyllic.
My new plan doesn’t change much but it will just mean that I won’t beable to walk into the new wildlife patch to sit and relax as the space will be very limited. I am still going to plant a grape vine on one side and I have already planted a rose bush and a climbing rose against my shed, I am also still going to grow 4 sunflowers along the back of the patch. The pond will measure roughly around 80cm by 50cm and will be placed in the centre of the patch with the shorter variety of flowers surrounding it and possibly some log piles or a little house for the frog.
I am hoping to visit a local ‘water world’ this weekend to get some advice aswell as purchasing a pond liner and some oxygenating plants. Ideally I would like to get the pond in as soon as possible, it won’t take long and then I can start planting my flowers around the pond rather then guessing where to plant them. I know, I know! Another thing added to my long list of things to do but I really don’t want to miss the frog season, if there is such a thing? I can’t wait to invite Mr toad and Mrs Frog into their new home
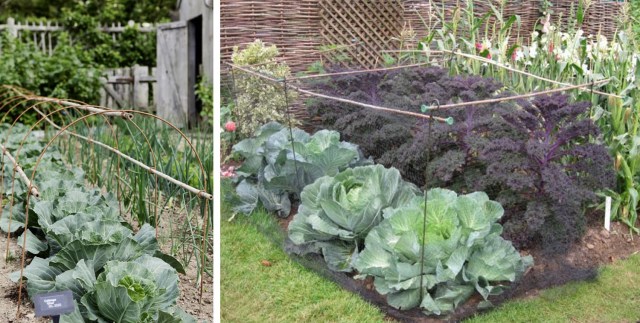
It’s May and the time has come to start thinking about protecting crops. My strawberries are currently covered in lovely little flowers and soon they will be producing delicious strawberries which will need protecting from birds and even rats! I have big plans for my strawberries and would like to make cordials and jams late in the year so I’m afraid I won’t be sharing them with the wildlife (sorry in advance!) Another crop which I would like to protect is my brassica bed. My Dad had some trouble with white butterflies last year so we are both going to be making sure our cabbages, sprouts and brocolli are well protected with good plant supports and netting.
Now as you well know by my previous posts I do like my allotment to look pretty aswell as being pratical, I know this shouldn’t be the case but I just think why not? Therefore I am in a bit of a quandary about which supports to use, now I came by two companies that produce beautiful kitchen garden plant supports and tunnels, http://www.plantsupportsuk.co.uk and http://www.plantbelles.co.uk. I also realise I could make my own unique supports out of hazel, that way it would match my archway (I do like things to match!) and it would also look rustic. So here are my choices in more detail:
Plant Belles: I mean just look at their tunnels, they are beautiful! I love the vintage and rustic look to them and the use of slotting bamboo canes through the metal hoops to join them all together is just genius! You can simply drape net, polythene, micromesh or fleece over the tunnels so they can provide all types of protection, you could even leave them as they are for plant supports or just because they look so pretty! They would also be easy to store in the winter months and are practical.
Plant Supports UK: Now this company have a huge range of plant supports aswell as a section called kitchen garden. My favourite pieces have to be the net cane supports, you get 6 supports in a set and they each have two rings at the top, you slot bamboo canes through these to create a rectangular cage and then yet again you can use net, polythene or fleece to drape over the entire frame. Simple, pratical, cheap and easy!
Handmade: Now I was going to use 3 lengths of hazel to bend into hoops to create a cloche over my strawberry beds, another length of hazel would run along the top to make the frame more stable. These would look rustic, be easy to assemble and store and also be cheap to make. Another idea is to buy some wooden square stakes, drill large holes through them and then slot bamboo through the holes to create a cage frame.
Ideally I would like my plant supports and cages to last a very long time, be easy and small enough to store away over winter and overall… be as cheap as possible. It seems I have a lot to think about but I know for one thing it’s going to be hard trying to choose when all the options are so beautiful!