Around a month ago in one in my previous videos I mentioned an idea to make a cooking program where I share recipes and cook produce grown in my allotment. So this video is my little experiment, obviously the cooking series will be a little better filmed. I will set my little oven up outside and have a better script too
But in the mean time I just wanted to share some cordial recipes using foraged sloe berries and cherry plums.
It’s recipe time and until my new website is up and running I’m afraid I’m having to write my recipes as blog posts. So here it is:
When my Dad found those little juicy plums whilst walking the dog I instantly turned to the ever so brilliant book by Alys Fowler called ‘the thrifty forager’. She confirmed that they were indeed cherry plums and was so kind as to share a tarte recipe on the opposite page. How could I ignore that, especially when it looked so delicious?! The recipe included a homemade pastry tart case, however I cheated and brought a sweet pastry case from the supermarket to save a bit of time. So here’s the recipe for the most delicious tarte in the whole world!
Ingredients:
50g cornflour
100g caster sugar
500ml milk
2 egg yolks
1 sweet pastry case (7-9 inches)
Approximately 500g of plums
Heat the Milk in a saucepan, do not let it boil. In a bowl mix together the sugar with the 2 yolks until it becomes smooth and shiny. Add the cornflower and stir well. Lower the heat on the milk and add the sugary egg mixture, stirring constantly. It usually takes around 15 minutes for the creme to cook. It should become stiff and come away from the sides of the pan. Let it cool in the saucepan off the heat. Cover the pan with cling film to stop the creme drying up.
Wash the plums, half them and remove the stones. Spread the creme over the pastry and cover neatly with plums. Bake the tart at 180C for 15-20 minutes - the plums will become soft and slightly caramelised.
A homemade bee hotel has been on my to-do list for quite a while now, I was originally going to make one out of bamboo canes and then create a little wooden frame to put them inside. However, the inspirational world of social media has given me a much better idea and I just couldn’t wait to go out and pick some… Common Hogweed! Now I must confess I never knew anything about this plant before apart from that it lines countryside roads and looks a little like a large cow parsley. Infact the stems are hollow and make great homes for leaf cutter bees! So off I went on my bicycle to forage some large common hogweed stems and I managed to find the mother load down a little country lane in my village (and I made a note to go back and forage the elderberries too!)
I’m going to cut them down to around 6 inches in length and leave them in the shed to dry out. Alternatively you can wait until later in the year when the whole plant has dried before foraging the stems, I decided to let them dry off inside incase the plants rotted in the rain (and we are forecast a lot of that during the next week!) The first stage of my bee hotel is in process, now all I need to do is make a little wooden frame to hold the stems, add a pretty slate roof, and give it a lick of paint and then all those leaf cutter bees whizzing around the allotment should be happy.
Now whilst I was out collecting the common hogweed stems I decided to go and look at a tree which my Dad had told me about. He brought a little fruit home one day after walking the dog and after lots of research we came to the conclusion is was a cherry plum, I was so excited! We loaded up the common hogweed stems onto our bikes and cycled down to a set of garage lock ups in the village where the cherry plum tree was. I just so happened to have brought a little egg basket with me and we managed to fill it up to the brim with those juicy little plums. I noticed there were loads more higher up out of our reach so I made a note to come back with a ladder (and I managed to get another basket full!) I’ll be making some cherry plum jam and a tarte very soon so stayed tuned for recipes!
I have come to the conclusion that foraging is one the most fun things to do! It’s food… for free! I have never felt happier then returning home with a basket full of cherry plums and a bag full of common hogweed stems. It’s amazing that I’ve been living in this village all my life and never noticed all the elderflowers, plums, sloe berries and black berries that are dotted around. I’ll be off foraging next weekend for elderberries and blackberries, everything seems to be so early this year due to all the sunny weather we’ve been having. Not that I’m complaining, it just means more jam for the store cupboard and more yummy desserts
This was the first year I went foraging for elderflower and I had such a great time, as a matter of fact I went foraging for it on two separate occasions and came home with baskets full of the pretty white flower heads. I did go a little overboard with making the cordial and champagne, in the end I think I made about 50 bottles (not that I’m complaining!) I especially love the cordial mixed with lemonade, however I found out that there are a lot of other recipes that use cordial as an ingrediant including the strawberry and elderflower jam recipe I featured in a previous post. I also happened to chance upon this jelly recipe and I just couldn’t wait to try it, I am a huge lover of jelly and elderflower so it was a match made in heaven! I had never made jelly before and didn’t realise it was this easy. It was the most delcious jelly I have ever tasted, my new favourite dessert and I will definately be making it again!
Recipe:
300 ml elderflower cordial
400 ml cold water
6 leaves gelatine
1 tsp fresh lemon juice
10 or more fresh strawberries, you can add how many you feel like!
Mix the cordial with the cold water in a jug. Soak the gelatine for 5 minutes in just enough cold water to cover. Meanwhile, warm 100 ml (3 fl oz) of the cordial mix in a medium pan until hot but not boiling. Remove from the heat.
Squeeze out any excess water from the gelatine. Stir the gelatine into the warm cordial until fully dissolved. Add the remaining cordial mix and the lemon juice, and stir well. You must add the remaining cordial to the dissolved gelatine and not vice versa, or it can cause the gelatine to go stringy.
Add the chopped strawberries to a bowl, pour on the jelly mixture and leave to chill overnight (tip: If you want the strawberries to be floating in the centre of the jelly then pour on half the mixture, let it chill for an hour and then pour on the rest of the jelly mixture and allow to set overnight)
It seems that the strawberry season is slowly coming to an end here on plot 15c and I am a little relieved. Don’t get me wrong, I love strawberries but there was a massive glut of them and after making lots of jam already I was a little bemused about what I could make with the rest. I came across a recipe for some strawberry cordial and it sounded delicious! I had already made lots of elderflower cordial and amongst it being really yummy I found that you can use it as an ingredient in so many things such as jelly (there will be another post all about my elderflower jelly very soon!) I used half of my strawberry harvest to make some more strawberry and elderflower jam because I love it so much, and then I used the other half to make the cordial.
Recipe: (to make roughly 2 litres or cordial)
1kg crushed strawberries
2 unwaxed lemon, thinly sliced
1.8kg caster sugar
1litre of water
Place the strawberries and lemon in a large glass bowl with the sugar and citric acid.
Bring the water to the boil and once boiled, pour it into the bowl and stir until all the sugar has dissolved.
Leave to cool, cover and place in a fridge for 4 days.
Strain through a muslin and decant into sterilised bottles. Keeps in the fridge for up to 6 months.
It tastes delicious with water, lemonade and it can be mixed with wine for that perfect summer drink (adults only!). If I don’t drink it all over the next week then I might try and make some jelly with it, or maybe even some ice lollies if the sun keeps shining
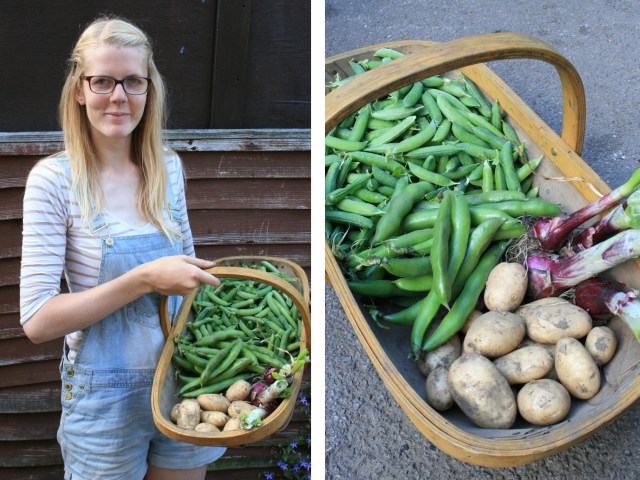
It is officially summer time and the harvests are starting to come in thick and fast, as a matter of fact I can’t keep up with all the crops! It doesn’t seem like long ago that I was planting the seeds and now I have peas, broad beans, potatoes and peas coming out my ears. I shouldn’t really be complaining because they are all delicious but it’s a full time job trying to freeze them, make jams, cordials or think of new recipes to try with the gluts. At least the potatoes tend to look after themselves and store rather well in the ground until I am ready to use them, they are the most delicious jersey royals I have ever tasted, I just wish I had planted more!
As for the rest of the allotment it is all starting to look lovely and green. The legume bed is by far the busiest with the broad beans and peas in full swing. The french beans and second double row of peas are growing nicely and I have yet to put in another row of peas for my succession planting. The borlotto beans are climbing rather high up my hazel archway and I just can’t wait until they have reached the top and produce lots of yummy beans to store away for winter. The fruit bed is also showing signs of a small harvest soon with a few very large gooseberries and some blackcurrants too, theres even 4 raspberries growing too! I even managed to squeeze some swiss chard into the fruit cage and over the past couple of days its doubled in size, it must be all this nice weather we are having.
The strawberries are going crazy and so are the tomatoes, I have to check daily and remove side shoots before they get out of hand and the poor basil is being overshadowed! The root bed is left to go it’s own thing, all the potatoes are ready so they are just waiting to be eaten. The only thing that hasn’t grown well in this bed is the carrots, which reminds me that I need to sow some more. Last but not least is the brassica bed which is slowly filling up. Now originally there was going to be one row of red cabbage, one row of purple sprouting broccoli, two rows of flower sprouts and 2 pumpkins in that bed. There has been a slight change in this plan and the broccoli is now moving over to my Dad’s new large plot so I have a spare area of soil where I can grow some cut flowers. I know I keep moaning about it but my plot is so tiny, there isn’t enough room to grow eveything I want to grow so this extra bit of space is most welcomed. Now all I need to do is decide on which flowers to put there while there is still time to grow them. On the other hand the pumpkins and red cabbage are growing great and the flower sprouts will be moving in this week once I get the netting and structure up and running to keep those pesky cabbage whites at bay.
I seriously can not get over how quickly things are growing, everytime I go up the allotment everything seems to be greener and bigger and the crops just keep coming. It makes all that hard work and blood, sweat and tears worth it thats for sure
The strawberry patch is going crazy! There are so many strawberries growing and an endless amount of big red juicy ones, if I’m being honest I’m getting a tad fed up with eating strawberries. So I came to conclusion that it was about time to dig out the jam making equipment and get making some preserves. I managed to collect a whopping 5.5 lbs of strawberries from both my raised beds, that would be more then enough for the two types of jams that I wanted to make; plain old strawberry jam and a new recipe; strawberry AND elderflower jam (two of my favourite things combined!)
Now I’ve made jam a few times and along the way I have collected some equipment like a large enamel jam pan, a thermometer, various funnels and lots of jam jars. The only problem I have is getting the right setting point, I’ve found that if I don’t rush and take my time to do the wrinkle test at different times during the making process then I can’t miss it!
I managed to make 3 large jars of plain strawberry jam as well as 2 small jars of the strawberry and elderflower jam. I just love strawberries and I love elderflower so I knew the recipe wouldn’t disappoint, unless I mucked it up of course. But I was very careful and stopped the process at the right setting point so the jam turned out perfect, and it tasted delicious too! I think what makes it extra special is the fact that I used homegrown strawberries freshly picked from my allotment and elderflower cordial which I had previously made from foraged elderflower. I will definitely be making some more of this jam once more strawberries turn red in my little patch, that’s for sure
Here’s the recipe for my strawberry and elderflower jam, you can simply double the ingredients if you want more jam (which I recommend as it’s so tasty!)
Recipe:
500g of strawberries (hulled and chopped)
1/2 of a granny smith apple (peeled and chopped)
400g of granulated sugar
6 tablespoons of elderflower cordial
2 tablespoons of lemon juice
Prep and cooking time; 45 minutes.
Put the strawberries and apple in a saucepan or jam pan, add the sugar and stir it up. Heat the pan on low until the fruits start to get juicy and the sugar becomes wet. Add the elderflower cordial. Now turn up the heat to medium until it becomes a rolling boil, do not stir from this point on. Set the timer for 15 minutes. Turn off the heat after 15 minutes and test a teaspoon on a cold saucer for the wrinkle test (Let the jam cool and then move your finger through the centre of the jam, if it wrinkles and leaves a track then the jam has set and it is ready) Let the jam cool down and then stir in the lemon juice. Transfer to a jam jar and allow to cool in a dark place. Once opened keep refrigerated.