This time I have teamed up with the beautiful Sarah Raven and her team, they have so kindly offered me one of their collections from the new Autumn catalogue to give-away. It was so hard to choose, the catalogue is filled to the brim with so many beautiful flowers! The collection that I have chosen however, is the stunning Venetian Tulip Collection consisting of 45 bulbs!
This stunning collection flowers from mid April to May, and will brighten up your pots and borders this year. All our tulip collections come with each variety in a separate bag, so you can decide exactly where to plant each colour.
The collection is made up of 3 different bulbs, an equal part each of :
Our tulip bulbs are the best and biggest we can find, from tried and trusted growers. Don’t forget that tulips like to be planted late in October and November with the colder weather, and need a little watering if planted in pots.
Oh and to make things even better, they have decided to include a packet of Munchkin Pumpkins seeds in the give-away along with the tulip collection! How nice is that? If you want to know more about the munchkin pumpkins then please feel feel to read my last blog post. I cannot recommend growing these enough, they taste delicious, are easy to grow, look great and climb really well!
All you have to do is comment below with your first name and surname before the 21st of September. The winner will then be selected at random. Good Luck!
Heres the small print:
UK Residents only.
If for some reason the selected items are unavailable, a suitable alternative will be found.
It’s September and the harvesting season has been in full swing for a few weeks now, but there is one crop which has to be my overall favourite. And thats the Munchkin Pumpkins. I first saw this plant in the Sarah Raven catalogue, in the photograph she had it growing up a frame and I instantly thought it would look perfect growing over my hazel archway. I was also drawn in by the cuteness of the size and the shape! I sowed 6 seeds overall, they all germinated but sadly only 1 died (I acidentally snapped the stem!). Therefore I put 2 plants on one side of my archway and 3 on the other side, and it didn’t take long for them to take over the frame. I originally had the pumpkins, sweet peas and borlotto beans growing up the archway but the poor sweet peas hardly produced, whereas the beans and pumpkins thrived. I now have a huge bag of borlotto beans hanging and drying in the shed and theres a glut of pumpkins, not that I’m complaining!
I am totally and utterly in love with these tiny pumpkins, just look how cute they are! Plus they taste absolutely delicious and they are so easy to grow. All I had to do was help them grow up the archway by securing the stems to the hazel, apart from that I didn’t do anything else to them and they have produced so many pumpkins. Definately a winner and one I will be growing next year!
Stayed tuned for tomorrow’s blog post, there’s going to be another giveaway and it’s a beautiful one!
Before I go I thought I would share the recipe on how I like to cook these little beauties, it’s rather simple but so delicious.
Munchkin Pumpkin stuffed with Kale, Chorizo and Cream
1 Munchkin Pumpkin
1 Teaspoon of Kale
1 Teaspoon of chopped Chorizo
Extra Thick Cream (any cream will do but I prefer extra thick, it melts down lovely!)
Cut the top of the pumpkin off, trying to keep it as straight as possible. Remove the seeds inside with a spoon and hollow it out. Fill with the kale, chorizo and then add two teaspoons of extra thick cream (or fill nearly to the brim with cream). Replace the pumpkin lid and then roast in the oven for 45 minutes.
For this years Fathers day I decided treat my Dad to a meal out at The Pig which is nearby in the New Forest. We’ve heard so many good reviews about this hotel/restaurant and after seeing it on the television we put it on our wishlist of places to visit. Now the best thing about this restaurant is that they have their own kitchen garden where they grow their own produce to cook, the food that they can’t grow is locally sourced. I booked the table for 12.30pm back in March as they get fully booked rather quickly, so we headed down to Brockenhurst with grumbling hungry bellies.
As we walked up to the hotel we were greeted by a large beautiful building with a large greenhouse style conservatory, there was even a large tree out the back with an old fashioned swing big enough to seat 3 people hanging from one of its large branches (unfortunately there were children playing on it, and they were still there after we had finished our meal so I couldn’t get a go on it!)
We went inside and as we were taken to our table I was blown away by the beauty (I actually gasped!), to sum it up I would call it a shabby chic, vintage garden potting shed. There is the largest pine dresser against one wall with crates, herbs and terracotta pots. Vintage enamel lamps and large paintings of walled gardens and allotments. Odd chairs, odd tables and odd cutlery which go perfectly together, with little strawberry plants as centre pieces on each table. Vintage tiles on the floor, hessian seat pads and plants growing up the pillars. I really cannot explain how lovely the decor is!
Now when it comes to the menu I was a little worried that my fussy tummy wouldn’t like anything they had to offer, how wrong was I! There was so much to choose from but I settled with a wild nettle and hock ham soup with some triple cooked rustic chips as a side (which came served in a terracotta pot!) The soup was surprisingly delicious and I’ve made a note to make some nettle soup at home. I also just have to mention how adorable the chips served in a terracotta pot was, but that was nothing compaired to my cranberry juice which was inside a welly boot shaped glass! Now for pudding there was only one thing I wanted and that was the hot white chocolate pot, which was served inside a cup and saucer with a shortbread biscuit balancing ontop with homegrown gooseberries, elderflower cream and edible flowers!
After our meal we decided to go for a little walk around the hotel’s grounds and have a nosey at their walled kitchen garden. It was the perfect size, not too big and not too small, there was even the most beautiful green house I had ever seen. I wanted to move in and live there! After exiting the kitchen garden and greenhouse the path lead you passed a large lake and the potting shed where they offer massages and beauty treatments, we made a note to return here simply because it looked so peaceful sitting in the middle of the lake. The path then turned into a wild flower meadow with a freshly mown path winding through it, it lead passed the walled garden and you could see right over the wall, the most perfect view. I cannot recommend this place enough, I loved it so much I can’t wait to go back again! The decor, the location, the food and the kitchen garden, everything was perfect. And if you don’t want to go there to eat then it’s worth popping in just to have a look around the kitchen garden. You won’t want to leave!
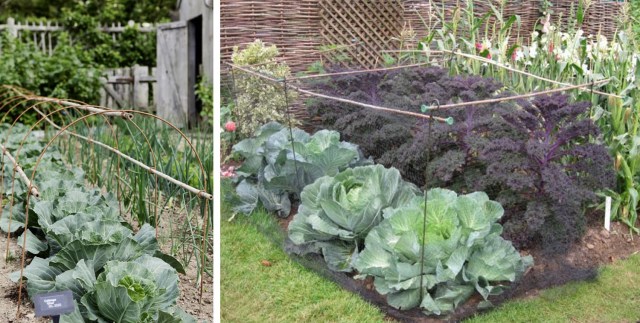
It’s May and the time has come to start thinking about protecting crops. My strawberries are currently covered in lovely little flowers and soon they will be producing delicious strawberries which will need protecting from birds and even rats! I have big plans for my strawberries and would like to make cordials and jams late in the year so I’m afraid I won’t be sharing them with the wildlife (sorry in advance!) Another crop which I would like to protect is my brassica bed. My Dad had some trouble with white butterflies last year so we are both going to be making sure our cabbages, sprouts and brocolli are well protected with good plant supports and netting.
Now as you well know by my previous posts I do like my allotment to look pretty aswell as being pratical, I know this shouldn’t be the case but I just think why not? Therefore I am in a bit of a quandary about which supports to use, now I came by two companies that produce beautiful kitchen garden plant supports and tunnels, http://www.plantsupportsuk.co.uk and http://www.plantbelles.co.uk. I also realise I could make my own unique supports out of hazel, that way it would match my archway (I do like things to match!) and it would also look rustic. So here are my choices in more detail:
Plant Belles: I mean just look at their tunnels, they are beautiful! I love the vintage and rustic look to them and the use of slotting bamboo canes through the metal hoops to join them all together is just genius! You can simply drape net, polythene, micromesh or fleece over the tunnels so they can provide all types of protection, you could even leave them as they are for plant supports or just because they look so pretty! They would also be easy to store in the winter months and are practical.
Plant Supports UK: Now this company have a huge range of plant supports aswell as a section called kitchen garden. My favourite pieces have to be the net cane supports, you get 6 supports in a set and they each have two rings at the top, you slot bamboo canes through these to create a rectangular cage and then yet again you can use net, polythene or fleece to drape over the entire frame. Simple, pratical, cheap and easy!
Handmade: Now I was going to use 3 lengths of hazel to bend into hoops to create a cloche over my strawberry beds, another length of hazel would run along the top to make the frame more stable. These would look rustic, be easy to assemble and store and also be cheap to make. Another idea is to buy some wooden square stakes, drill large holes through them and then slot bamboo through the holes to create a cage frame.
Ideally I would like my plant supports and cages to last a very long time, be easy and small enough to store away over winter and overall… be as cheap as possible. It seems I have a lot to think about but I know for one thing it’s going to be hard trying to choose when all the options are so beautiful!
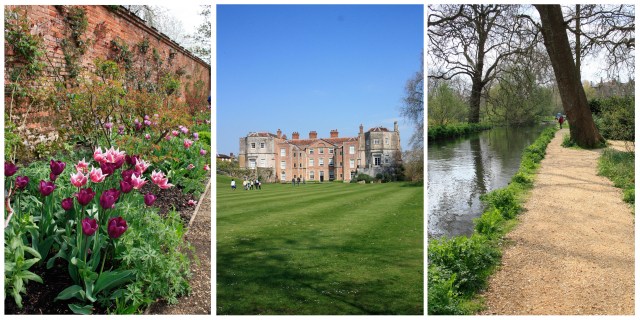
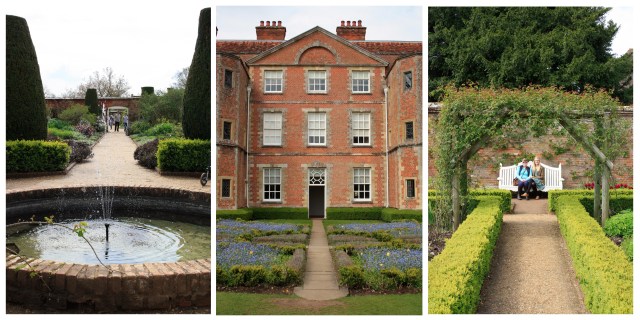
It’s tradition to go and visit a house or a garden on a bank holiday, or it was a tradition when I was younger but It seems hobbies, DIY projects and acquiring allotments took over our lives. This Easter bank holiday however, we decided as a family to go to a National Trust location literally 15 minutes down the road which we had never, ever visited before believe it or not!
Mottisfont Abbey was crafted from a medieval priory, with a walled garden and lots of estate to explore it was the perfect day out. The sun decided to shine for the majority of the day and we had a lovely look around the gardens before walking beside the river and through the wild meadow. A quick spot of delicious lunch in the beautifully furnished kitchen cafe before looking around the large house and at the Lichfield Photography exhibition upstairs to end the most perfect of days.
I have been so busy on mine and my Dads allotments lately that it was lovely to have a day off from all the digging and weeding to walk around these lovely gardens. And the best thing about today? We joined the National Trust so we are planning on going back in the Summer for picnic’s and to see the gardens in full bloom! No doubt there will be plenty of more photographs to follow
So I tried to make a short, quick update on how my allotment is so far, whats been growing and what’s been done. Turns out I just can’t stop talking about my plot so the short video turned out to be 26 minutes long… Opps!
It was my Dads birthday yesterday and he got deservedly spoilt! We had lunch out at a lovely independent garden centre before having a look around at all their goodies. I treated him to a couple of Chillington tools (which we will be reviewing in a future video) and a mug for his shed which has ‘Head Gardener’ on it (he likes to point this out every now and again!)
Another treat was his birthday cake. Now my Dad is very much an allotmenteer, he loves his allotment and spends the majority of his time on his plot. So when it came down to making a cake we just had to make him a little mini vegetable garden!
This was very much a team effort, my Mum was in charge of making the sponge cake and icing it. We used chocolate buttercream for the dirt vegetable beds and green coloured buttercream for the grass pathways. We also brought 2 packets of chocolate fingers to act as a picket fence around the garden which worked really well and tasted nice too!
I was in charge of making the vegetables out of coloured icing, which took me a good few hours might I add! I decided to keep it simple by making easy shapes like the pumpkins and the peas. The cauliflowers and cabbages where made using balls of icing and small circle leaves layered up around the middle ball. The carrots and leeks were a little tricky, I ued white icing for the base of the leeks and then layered on 4 strips of green icing to make the top leaves. The carrots tops were the fiddliest part as they were very small!
To finish it all off I made a small sign using a lollypop stick and a small piece of slate with a simple ‘Happy Birthday’ written on the front. Overall all it took the both of us 4 hours to make and decorate the cake but the look on my Dads face made it all worth it. My Dad was aboslutely over the moon with it and couldn’t believe that we made it! So overall it was a success and my Dad had a splendid Birthday which is all that matters.
I must admit I am a bit of a notebook freak, I love making sketchbooks and you will find atleast 20 notebooks sitting in my room which haven’t been written in yet (I probably brought them because they were so pretty!) I love documenting things so when it came down to finding a suitable gardening journal it took me a while to find one I liked. Now I know there are a few allotment diaries around but I found that most of them contained a fair amount of pages telling you how to grow things instead of including valuable writing space. I was after a diary which was a diary and not a reference book, a diary which would allow me space to record my first year on my allotment so I could later look back on it for references and tips.
I found this particular journal one night when searching the internet and it is simply called ‘Gardener’s Journal’, by Sophie Conran for Burgon and Ball (it points this out on the front cover which I’m tempted to make my own label to stick over it) It is A5 in size and has a lovely print on the front and back along with an elasticated strap to secure the book closed. It was the inside of the book which interested me however and it didn’t dissapoint, it even had a lovely quote inside the cover which reads ‘A journal is one of the most helpful tools a gardener can have’.
It has dividers down the side for each month of the year, handy for future reference and the pages in each month are the same, just simply repeated. Some of the months share the same divider, including Jan/Feb and Nov/Dec, simply due to these months being rather quiet on the gardening front. One of my favourite pages is a double spread for attaching small photographs too, I am obssessed with taking photographs so this is perfect for me, I also think its great to look back throughout the year and see your progress in photographs aswell as writing.
There is also a monthly to-do list at the start of each month aswell as a weekly planner and doodle area. You get to check each to-do item off the list which makes it extremely helpful, especially when your someone like me who forgets to do things without being reminded! You can treat the little weekly calender as a diary, writing down important dates or when you plant certain things. Another double page consists of a weather log where you can record the date, the highest and lowest temperature, the wind speed, sunlight and the rainfall. At the end of each month are 2 pages of lined paper for notes so you can write down other important information like which seeds you purchased, any advice and tips etc.
After all the monthly dividers have ended, which takes up around two thirds of the journal, is a section called ‘Planning and Documenting’. This section has 4 double pages called ‘Planting Diary’ where you can record the variety, when is was sown, when it germinated, when it was planted out, fertilized and when it flowered or fruited. It also has 12 double pages called ‘Special Plant notes’, pages of grid paper and plain paper for planning and doodles. And last but not least is a small ‘Snippets’ expanding page which is attached to the back cover for holding plant labels or seed packets etc.
Overall I am chuffed with my new little allotment journal, it does exactly what I need it to do and this is simply to record my successes and my failures during my first year. This way I can look back and change certain areas, try different techniques and most of all learn by my mistakes and celebrate my triumphs. Now all I need to do it fill it up!